SQLite ist eine OpenSource SQL Datenbank, die Daten in einer Textdatei auf einem Gerät speichert. Android kommt mit einer eingebauten SQLite-Datenbank-Implementierung.
SQLite unterstützt alle Funktionen einer relationalen Datenbank. Um auf diese Datenbank zuzugreifen, müssen Sie keine Verbindungen wie JDBC, ODBC etc. aufbauen
Datenbank – Paket
Das Hauptpaket ist android.database.sqlite, das die Klassen enthält, um eigene Datenbanken zu verwalten
Datenbank – Erstellung
Um eine Datenbank zu erstellen, müssen Sie nur diese Methode openOrCreateDatabase mit Ihrem Datenbanknamen und -modus als Parameter aufrufen. Sie gibt eine Instanz der SQLite-Datenbank zurück, die Sie in Ihr eigenes Objekt aufnehmen müssen.Die Syntax ist unten angegeben
SQLiteDatabase mydatabase = openOrCreateDatabase("your database name",MODE_PRIVATE,null);
Außer dieser Methode gibt es noch andere Funktionen im Datenbankpaket, die diese Aufgabe übernehmen. Sie sind unten aufgeführt
| Sr.Nein | Methode & Beschreibung |
|---|---|
| 1 |
openDatabase(String path, SQLiteDatabase.CursorFactory factory, int flags, DatabaseErrorHandler errorHandler) Diese Methode öffnet die vorhandene Datenbank nur mit dem entsprechenden Flag-Modus. Der übliche Flags-Modus könnte OPEN_READWRITE OPEN_READONLY |
| 2 |
openDatabase(String path, SQLiteDatabase.CursorFactory factory, int flags) Sie ähnelt der obigen Methode, da sie ebenfalls die vorhandene Datenbank öffnet, aber keinen Handler zur Behandlung von Datenbankfehlern definiert |
| 3 |
openOrCreateDatabase(String path, SQLiteDatabase.CursorFactory factory) Sie öffnet die Datenbank nicht nur, sondern erstellt sie auch, falls sie nicht vorhanden ist. Diese Methode ist äquivalent zur openDatabase-Methode. |
| 4 |
openOrCreateDatabase(File file, SQLiteDatabase.CursorFactory factory) Diese Methode ist ähnlich wie die obige Methode, aber sie nimmt das File-Objekt als Pfad und nicht als String. Sie ist äquivalent zu file.getPath() |
Datenbank – Einfügen
Mit der in der Klasse SQLiteDatabase definierten Methode execSQL können wir eine Tabelle erstellen oder Daten in eine Tabelle einfügen. Die Syntax ist unten angegeben
mydatabase.execSQL("CREATE TABLE IF NOT EXISTS TutorialsPoint(Username VARCHAR,Password VARCHAR);");mydatabase.execSQL("INSERT INTO TutorialsPoint VALUES('admin','admin');");
Damit werden einige Werte in unsere Tabelle in unserer Datenbank eingefügt. Eine andere Methode, die die gleiche Aufgabe erfüllt, aber einige zusätzliche Parameter benötigt, ist unten angegeben
| Sr.Nein | Methode & Beschreibung |
|---|---|
| 1 |
execSQL(String sql, Object bindArgs) Diese Methode kann nicht nur Daten einfügen , sondern auch zum Aktualisieren oder Ändern bereits vorhandener Daten in der Datenbank mit Hilfe von bindArgumenten |
Datenbank – Abrufen
Wir können alles aus der Datenbank mit Hilfe eines Objekts der Klasse Cursor abrufen. Wir rufen eine Methode dieser Klasse namens rawQuery auf, die ein Resultset zurückgibt, in dem der Cursor auf die Tabelle zeigt. Wir können den Cursor vorwärts bewegen und die Daten abrufen.
Cursor resultSet = mydatbase.rawQuery("Select * from TutorialsPoint",null);resultSet.moveToFirst();String username = resultSet.getString(0);String password = resultSet.getString(1);
Es gibt noch weitere Funktionen in der Cursor-Klasse, mit denen wir die Daten effektiv abrufen können. Dazu gehören
| Sr.Nr | Methode & Beschreibung |
|---|---|
| 1 |
getColumnCount() Diese Methode gibt die Gesamtanzahl der Spalten der Tabelle zurück. |
| 2 |
getColumnIndex(String columnName) Diese Methode liefert die Indexnummer einer Spalte durch Angabe des Namens der Spalte |
| 3 |
getColumnName(int columnIndex) Diese Methode gibt den Namen der Spalte zurück, indem sie den Index der Spalte angibt |
| 4 |
getColumnNames() Diese Methode gibt das Array mit allen Spaltennamen der Tabelle zurück. |
| 5 |
getCount() Diese Methode liefert die Gesamtanzahl der Zeilen im Cursor |
| 6 |
getPosition() Diese Methode liefert die aktuelle Position des Cursors in der Tabelle zurück |
| 7 |
isClosed() Diese Methode gibt true zurück, wenn der Cursor geschlossen ist und ansonsten false |
Datenbank – Hilfsklasse
Für die Verwaltung aller Operationen im Zusammenhang mit der Datenbank , wurde eine Hilfsklasse mit dem Namen SQLiteOpenHelper erstellt. Sie verwaltet automatisch die Erstellung und Aktualisierung der Datenbank. Seine Syntax ist unten angegeben
public class DBHelper extends SQLiteOpenHelper { public DBHelper(){ super(context,DATABASE_NAME,null,1); } public void onCreate(SQLiteDatabase db) {} public void onUpgrade(SQLiteDatabase database, int oldVersion, int newVersion) {}}
Beispiel
Hier ist ein Beispiel, das die Verwendung der SQLite-Datenbank zeigt. Es erstellt eine grundlegende Kontaktanwendung, die das Einfügen, Löschen und Ändern von Kontakten ermöglicht.
Um mit diesem Beispiel zu experimentieren, müssen Sie es auf einem tatsächlichen Gerät ausführen, auf dem die Kamera unterstützt wird.
| Schritte | Beschreibung |
|---|---|
| 1 | Sie werden Android Studio verwenden, um eine Android-Anwendung unter dem Paket com.example.sairamkrishna.myapplication. |
| 2 | Modifizieren Sie die Datei src/MainActivity.java, um Referenzen aller XML-Komponenten zu erhalten und die Kontakte in listView aufzufüllen. |
| 3 | Erstellen Sie eine neue src/DBHelper.java, die die Datenbankarbeit verwaltet | 4 | Erstellen Sie eine neue Activity als DisplayContact.java, die den Kontakt auf dem Bildschirm anzeigt |
| 5 | Modifizieren Sie die res/layout/activity_main, um die entsprechenden XML-Komponenten hinzuzufügen |
| 6 | Modifizieren Sie die res/layout/activity_display_contact.xml, um entsprechende XML-Komponenten hinzuzufügen |
| 7 | Modifizieren Sie die res/values/string.xml, um notwendige String-Komponenten hinzuzufügen |
| 8 | Modifizieren Sie die res/menu/display_contact.xml, um die notwendigen Menükomponenten hinzuzufügen |
| 9 | Erstellen Sie ein neues Menü als res/menu/mainmenu.xml, um die Option „Kontakt einfügen“ hinzuzufügen | 10 | Starten Sie die Anwendung und wählen Sie ein laufendes Android-Gerät aus und installieren Sie die Anwendung darauf und überprüfen Sie die Ergebnisse. |
Nachfolgend ist der Inhalt der modifizierten MainActivity.java.
package com.example.sairamkrishna.myapplication;import android.content.Context;import android.content.Intent;import android.support.v7.app.ActionBarActivity;import android.os.Bundle;import android.view.KeyEvent;import android.view.Menu;import android.view.MenuItem;import android.view.View;import android.widget.AdapterView;import android.widget.ArrayAdapter;import android.widget.AdapterView.OnItemClickListener;import android.widget.ListView;import java.util.ArrayList;import java.util.List;public class MainActivity extends ActionBarActivity { public final static String EXTRA_MESSAGE = "MESSAGE"; private ListView obj; DBHelper mydb; @Override protected void onCreate(Bundle savedInstanceState) { super.onCreate(savedInstanceState); setContentView(R.layout.activity_main); mydb = new DBHelper(this); ArrayList array_list = mydb.getAllCotacts(); ArrayAdapter arrayAdapter=new ArrayAdapter(this,android.R.layout.simple_list_item_1, array_list); obj = (ListView)findViewById(R.id.listView1); obj.setAdapter(arrayAdapter); obj.setOnItemClickListener(new OnItemClickListener(){ @Override public void onItemClick(AdapterView<?> arg0, View arg1, int arg2,long arg3) { // TODO Auto-generated method stub int id_To_Search = arg2 + 1; Bundle dataBundle = new Bundle(); dataBundle.putInt("id", id_To_Search); Intent intent = new Intent(getApplicationContext(),DisplayContact.class); intent.putExtras(dataBundle); startActivity(intent); } }); } @Override public boolean onCreateOptionsMenu(Menu menu) { // Inflate the menu; this adds items to the action bar if it is present. getMenuInflater().inflate(R.menu.menu_main, menu); return true; } @Override public boolean onOptionsItemSelected(MenuItem item){ super.onOptionsItemSelected(item); switch(item.getItemId()) { case R.id.item1:Bundle dataBundle = new Bundle(); dataBundle.putInt("id", 0); Intent intent = new Intent(getApplicationContext(),DisplayContact.class); intent.putExtras(dataBundle); startActivity(intent); return true; default: return super.onOptionsItemSelected(item); } } public boolean onKeyDown(int keycode, KeyEvent event) { if (keycode == KeyEvent.KEYCODE_BACK) { moveTaskToBack(true); } return super.onKeyDown(keycode, event); }}
Nachfolgend ist der geänderte Inhalt der Anzeigekontakt-Aktivität DisplayContact.java
package com.example.sairamkrishna.myapplication;import android.os.Bundle;import android.app.Activity;import android.app.AlertDialog;import android.content.DialogInterface;import android.content.Intent;import android.database.Cursor;import android.view.Menu;import android.view.MenuItem;import android.view.View;import android.widget.Button;import android.widget.TextView;import android.widget.Toast;public class DisplayContact extends Activity { int from_Where_I_Am_Coming = 0; private DBHelper mydb ; TextView name ; TextView phone; TextView email; TextView street; TextView place; int id_To_Update = 0; @Override protected void onCreate(Bundle savedInstanceState) { super.onCreate(savedInstanceState); setContentView(R.layout.activity_display_contact); name = (TextView) findViewById(R.id.editTextName); phone = (TextView) findViewById(R.id.editTextPhone); email = (TextView) findViewById(R.id.editTextStreet); street = (TextView) findViewById(R.id.editTextEmail); place = (TextView) findViewById(R.id.editTextCity); mydb = new DBHelper(this); Bundle extras = getIntent().getExtras(); if(extras !=null) { int Value = extras.getInt("id"); if(Value>0){ //means this is the view part not the add contact part. Cursor rs = mydb.getData(Value); id_To_Update = Value; rs.moveToFirst(); String nam = rs.getString(rs.getColumnIndex(DBHelper.CONTACTS_COLUMN_NAME)); String phon = rs.getString(rs.getColumnIndex(DBHelper.CONTACTS_COLUMN_PHONE)); String emai = rs.getString(rs.getColumnIndex(DBHelper.CONTACTS_COLUMN_EMAIL)); String stree = rs.getString(rs.getColumnIndex(DBHelper.CONTACTS_COLUMN_STREET)); String plac = rs.getString(rs.getColumnIndex(DBHelper.CONTACTS_COLUMN_CITY)); if (!rs.isClosed()) { rs.close(); } Button b = (Button)findViewById(R.id.button1); b.setVisibility(View.INVISIBLE); name.setText((CharSequence)nam); name.setFocusable(false); name.setClickable(false); phone.setText((CharSequence)phon); phone.setFocusable(false); phone.setClickable(false); email.setText((CharSequence)emai); email.setFocusable(false); email.setClickable(false); street.setText((CharSequence)stree); street.setFocusable(false); street.setClickable(false); place.setText((CharSequence)plac); place.setFocusable(false); place.setClickable(false); } } } @Override public boolean onCreateOptionsMenu(Menu menu) { // Inflate the menu; this adds items to the action bar if it is present. Bundle extras = getIntent().getExtras(); if(extras !=null) { int Value = extras.getInt("id"); if(Value>0){ getMenuInflater().inflate(R.menu.display_contact, menu); } else{ getMenuInflater().inflate(R.menu.menu_main menu); } } return true; } public boolean onOptionsItemSelected(MenuItem item) { super.onOptionsItemSelected(item); switch(item.getItemId()) { case R.id.Edit_Contact: Button b = (Button)findViewById(R.id.button1); b.setVisibility(View.VISIBLE); name.setEnabled(true); name.setFocusableInTouchMode(true); name.setClickable(true); phone.setEnabled(true); phone.setFocusableInTouchMode(true); phone.setClickable(true); email.setEnabled(true); email.setFocusableInTouchMode(true); email.setClickable(true); street.setEnabled(true); street.setFocusableInTouchMode(true); street.setClickable(true); place.setEnabled(true); place.setFocusableInTouchMode(true); place.setClickable(true); return true; case R.id.Delete_Contact: AlertDialog.Builder builder = new AlertDialog.Builder(this); builder.setMessage(R.string.deleteContact) .setPositiveButton(R.string.yes, new DialogInterface.OnClickListener() { public void onClick(DialogInterface dialog, int id) { mydb.deleteContact(id_To_Update); Toast.makeText(getApplicationContext(), "Deleted Successfully", Toast.LENGTH_SHORT).show(); Intent intent = new Intent(getApplicationContext(),MainActivity.class); startActivity(intent); } }) .setNegativeButton(R.string.no, new DialogInterface.OnClickListener() { public void onClick(DialogInterface dialog, int id) { // User cancelled the dialog } }); AlertDialog d = builder.create(); d.setTitle("Are you sure"); d.show(); return true; default: return super.onOptionsItemSelected(item); } } public void run(View view) { Bundle extras = getIntent().getExtras(); if(extras !=null) { int Value = extras.getInt("id"); if(Value>0){ if(mydb.updateContact(id_To_Update,name.getText().toString(), phone.getText().toString(), email.getText().toString(), street.getText().toString(), place.getText().toString())){ Toast.makeText(getApplicationContext(), "Updated", Toast.LENGTH_SHORT).show(); Intent intent = new Intent(getApplicationContext(),MainActivity.class); startActivity(intent); } else{ Toast.makeText(getApplicationContext(), "not Updated", Toast.LENGTH_SHORT).show(); } } else{ if(mydb.insertContact(name.getText().toString(), phone.getText().toString(), email.getText().toString(), street.getText().toString(), place.getText().toString())){ Toast.makeText(getApplicationContext(), "done", Toast.LENGTH_SHORT).show(); } else{ Toast.makeText(getApplicationContext(), "not done", Toast.LENGTH_SHORT).show(); } Intent intent = new Intent(getApplicationContext(),MainActivity.class); startActivity(intent); } } }}
Nachfolgend ist der Inhalt der Datenbank-Klasse DBHelper.java
package com.example.sairamkrishna.myapplication;import java.util.ArrayList;import java.util.HashMap;import java.util.Hashtable;import android.content.ContentValues;import android.content.Context;import android.database.Cursor;import android.database.DatabaseUtils;import android.database.sqlite.SQLiteOpenHelper;import android.database.sqlite.SQLiteDatabase;public class DBHelper extends SQLiteOpenHelper { public static final String DATABASE_NAME = "MyDBName.db"; public static final String CONTACTS_TABLE_NAME = "contacts"; public static final String CONTACTS_COLUMN_ID = "id"; public static final String CONTACTS_COLUMN_NAME = "name"; public static final String CONTACTS_COLUMN_EMAIL = "email"; public static final String CONTACTS_COLUMN_STREET = "street"; public static final String CONTACTS_COLUMN_CITY = "place"; public static final String CONTACTS_COLUMN_PHONE = "phone"; private HashMap hp; public DBHelper(Context context) { super(context, DATABASE_NAME , null, 1); } @Override public void onCreate(SQLiteDatabase db) { // TODO Auto-generated method stub db.execSQL( "create table contacts " + "(id integer primary key, name text,phone text,email text, street text,place text)" ); } @Override public void onUpgrade(SQLiteDatabase db, int oldVersion, int newVersion) { // TODO Auto-generated method stub db.execSQL("DROP TABLE IF EXISTS contacts"); onCreate(db); } public boolean insertContact (String name, String phone, String email, String street,String place) { SQLiteDatabase db = this.getWritableDatabase(); ContentValues contentValues = new ContentValues(); contentValues.put("name", name); contentValues.put("phone", phone); contentValues.put("email", email); contentValues.put("street", street); contentValues.put("place", place); db.insert("contacts", null, contentValues); return true; } public Cursor getData(int id) { SQLiteDatabase db = this.getReadableDatabase(); Cursor res = db.rawQuery( "select * from contacts where", null ); return res; } public int numberOfRows(){ SQLiteDatabase db = this.getReadableDatabase(); int numRows = (int) DatabaseUtils.queryNumEntries(db, CONTACTS_TABLE_NAME); return numRows; } public boolean updateContact (Integer id, String name, String phone, String email, String street,String place) { SQLiteDatabase db = this.getWritableDatabase(); ContentValues contentValues = new ContentValues(); contentValues.put("name", name); contentValues.put("phone", phone); contentValues.put("email", email); contentValues.put("street", street); contentValues.put("place", place); db.update("contacts", contentValues, "id = ? ", new String { Integer.toString(id) } ); return true; } public Integer deleteContact (Integer id) { SQLiteDatabase db = this.getWritableDatabase(); return db.delete("contacts", "id = ? ", new String { Integer.toString(id) }); } public ArrayList<String> getAllCotacts() { ArrayList<String> array_list = new ArrayList<String>(); //hp = new HashMap(); SQLiteDatabase db = this.getReadableDatabase(); Cursor res = db.rawQuery( "select * from contacts", null ); res.moveToFirst(); while(res.isAfterLast() == false){ array_list.add(res.getString(res.getColumnIndex(CONTACTS_COLUMN_NAME))); res.moveToNext(); } return array_list; }}
Nachfolgend ist der Inhalt der res/layout/activity_main.xml
<?xml version="1.0" encoding="utf-8"?><RelativeLayout xmlns:android="http://schemas.android.com/apk/res/android" xmlns:tools="http://schemas.android.com/tools" android:layout_width="match_parent" android:layout_height="match_parent" android:paddingLeft="@dimen/activity_horizontal_margin" android:paddingRight="@dimen/activity_horizontal_margin" android:paddingTop="@dimen/activity_vertical_margin" android:paddingBottom="@dimen/activity_vertical_margin" tools:context=".MainActivity"> <TextView android:layout_width="wrap_content" android:layout_height="wrap_content" android:id="@+id/textView" android:layout_alignParentTop="true" android:layout_centerHorizontal="true" android:textSize="30dp" android:text="Data Base" /> <TextView android:layout_width="wrap_content" android:layout_height="wrap_content" android:text="Tutorials Point" android:id="@+id/textView2" android:layout_below="@+id/textView" android:layout_centerHorizontal="true" android:textSize="35dp" android:textColor="#ff16ff01" /> <ImageView android:layout_width="wrap_content" android:layout_height="wrap_content" android:id="@+id/imageView" android:layout_below="@+id/textView2" android:layout_centerHorizontal="true" android:src="@drawable/logo"/> <ScrollView android:layout_width="wrap_content" android:layout_height="wrap_content" android:id="@+id/scrollView" android:layout_below="@+id/imageView" android:layout_alignParentLeft="true" android:layout_alignParentStart="true" android:layout_alignParentBottom="true" android:layout_alignParentRight="true" android:layout_alignParentEnd="true"> <ListView android:id="@+id/listView1" android:layout_width="match_parent" android:layout_height="wrap_content" android:layout_centerHorizontal="true" android:layout_centerVertical="true" > </ListView> </ScrollView></RelativeLayout>
Nachfolgend ist der Inhalt der res/layout/activity_display_contact.xml
<?xml version="1.0" encoding="utf-8"?><ScrollView xmlns:android="http://schemas.android.com/apk/res/android" xmlns:tools="http://schemas.android.com/tools" android:id="@+id/scrollView1" android:layout_width="match_parent" android:layout_height="wrap_content" tools:context=".DisplayContact" > <RelativeLayout android:layout_width="match_parent" android:layout_height="370dp" android:paddingBottom="@dimen/activity_vertical_margin" android:paddingLeft="@dimen/activity_horizontal_margin" android:paddingRight="@dimen/activity_horizontal_margin" android:paddingTop="@dimen/activity_vertical_margin"> <EditText android:id="@+id/editTextName" android:layout_width="wrap_content" android:layout_height="wrap_content" android:layout_alignParentLeft="true" android:layout_marginTop="5dp" android:layout_marginLeft="82dp" android:ems="10" android:inputType="text" > </EditText> <EditText android:id="@+id/editTextEmail" android:layout_width="wrap_content" android:layout_height="wrap_content" android:layout_alignLeft="@+id/editTextStreet" android:layout_below="@+id/editTextStreet" android:layout_marginTop="22dp" android:ems="10" android:inputType="textEmailAddress" /> <TextView android:id="@+id/textView1" android:layout_width="wrap_content" android:layout_height="wrap_content" android:layout_alignBottom="@+id/editTextName" android:layout_alignParentLeft="true" android:text="@string/name" android:textAppearance="?android:attr/textAppearanceMedium" /> <Button android:id="@+id/button1" android:layout_width="wrap_content" android:layout_height="wrap_content" android:layout_alignLeft="@+id/editTextCity" android:layout_alignParentBottom="true" android:layout_marginBottom="28dp" android:onClick="run" android:text="@string/save" /> <TextView android:id="@+id/textView2" android:layout_width="wrap_content" android:layout_height="wrap_content" android:layout_alignBottom="@+id/editTextEmail" android:layout_alignLeft="@+id/textView1" android:text="@string/email" android:textAppearance="?android:attr/textAppearanceMedium" /> <TextView android:id="@+id/textView5" android:layout_width="wrap_content" android:layout_height="wrap_content" android:layout_alignBottom="@+id/editTextPhone" android:layout_alignLeft="@+id/textView1" android:text="@string/phone" android:textAppearance="?android:attr/textAppearanceMedium" /> <TextView android:id="@+id/textView4" android:layout_width="wrap_content" android:layout_height="wrap_content" android:layout_above="@+id/editTextEmail" android:layout_alignLeft="@+id/textView5" android:text="@string/street" android:textAppearance="?android:attr/textAppearanceMedium" /> <EditText android:id="@+id/editTextCity" android:layout_width="wrap_content" android:layout_height="wrap_content" android:layout_alignRight="@+id/editTextName" android:layout_below="@+id/editTextEmail" android:layout_marginTop="30dp" android:ems="10" android:inputType="text" /> <TextView android:id="@+id/textView3" android:layout_width="wrap_content" android:layout_height="wrap_content" android:layout_alignBaseline="@+id/editTextCity" android:layout_alignBottom="@+id/editTextCity" android:layout_alignParentLeft="true" android:layout_toLeftOf="@+id/editTextEmail" android:text="@string/country" android:textAppearance="?android:attr/textAppearanceMedium" /> <EditText android:id="@+id/editTextStreet" android:layout_width="wrap_content" android:layout_height="wrap_content" android:layout_alignLeft="@+id/editTextName" android:layout_below="@+id/editTextPhone" android:ems="10" android:inputType="text" > <requestFocus /> </EditText> <EditText android:id="@+id/editTextPhone" android:layout_width="wrap_content" android:layout_height="wrap_content" android:layout_alignLeft="@+id/editTextStreet" android:layout_below="@+id/editTextName" android:ems="10" android:inputType="phone|text" /> </RelativeLayout></ScrollView>
Nachfolgend ist der Inhalt der res/value/string.xml
<?xml version="1.0" encoding="utf-8"?><resources> <string name="app_name">Address Book</string> <string name="action_settings">Settings</string> <string name="hello_world">Hello world!</string> <string name="Add_New">Add New</string> <string name="edit">Edit Contact</string> <string name="delete">Delete Contact</string> <string name="title_activity_display_contact">DisplayContact</string> <string name="name">Name</string> <string name="phone">Phone</string> <string name="email">Email</string> <string name="street">Street</string> <string name="country">City/State/Zip</string> <string name="save">Save Contact</string> <string name="deleteContact">Are you sure, you want to delete it.</string> <string name="yes">Yes</string> <string name="no">No</string></resources>
Nachfolgend ist der Inhalt der res/menu/main_menu.xml
<?xml version="1.0" encoding="utf-8"?><menu xmlns:android="http://schemas.android.com/apk/res/android" > <item android:id="@+id/item1" android:icon="@drawable/add" android:title="@string/Add_New" > </item> </menu>
Nachfolgend ist der Inhalt der res/menu/display_contact.xml
<?xml version="1.0" encoding="utf-8"?><menu xmlns:android="http://schemas.android.com/apk/res/android" > <item android:id="@+id/Edit_Contact" android:orderInCategory="100" android:title="@string/edit"/> <item android:id="@+id/Delete_Contact" android:orderInCategory="100" android:title="@string/delete"/></menu>
Dies ist die defualt AndroidManifest.xml dieses Projekts
<?xml version="1.0" encoding="utf-8"?><manifest xmlns:android="http://schemas.android.com/apk/res/android" package="com.example.sairamkrishna.myapplication" > <application android:allowBackup="true" android:icon="@mipmap/ic_launcher" android:label="@string/app_name" android:theme="@style/AppTheme" > <activity android:name=".MainActivity" android:label="@string/app_name" > <intent-filter> <action android:name="android.intent.action.MAIN" /> <category android:name="android.intent.category.LAUNCHER" /> </intent-filter> </activity> <activity android:name=".DisplayContact"/> </application></manifest>
Lassen Sie uns versuchen, Ihre Anwendung zu starten. Ich gehe davon aus, dass Sie Ihr aktuelles Android Mobile Gerät mit Ihrem Computer verbunden haben. Um die App von Android Studio aus zu starten, öffnen Sie eine der Aktivitätsdateien Ihres Projekts und klicken Sie auf das Symbol  in der Symbolleiste. Bevor Sie Ihre Anwendung starten, zeigt Android Studio folgendes Fenster an, um eine Option auszuwählen, mit der Sie Ihre Android-Anwendung ausführen möchten.

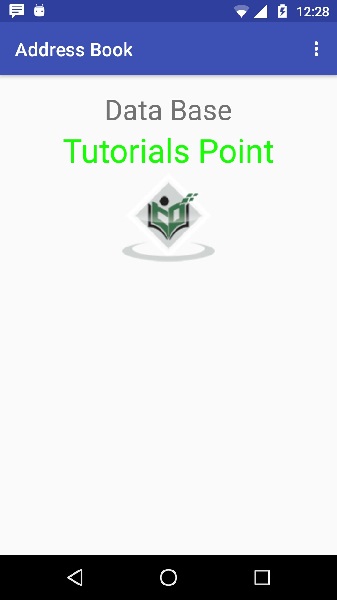
Wählen Sie Ihr mobiles Gerät als Option aus und überprüfen Sie dann Ihr mobiles Gerät, woraufhin der folgende Bildschirm angezeigt wird –
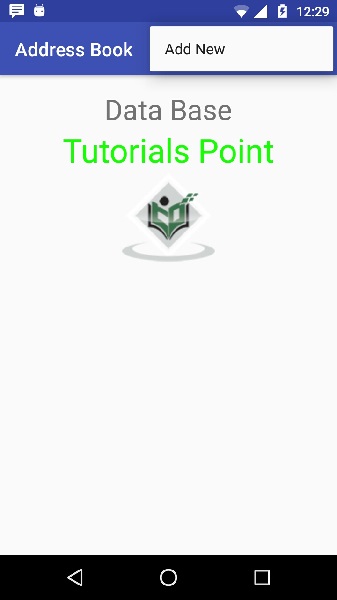
Nun öffnen Sie Ihr optionales Menü, es wird wie unten abgebildet angezeigt: Das optionale Menü erscheint bei verschiedenen Versionen an unterschiedlichen Stellen
Klicken Sie auf die Schaltfläche „Hinzufügen“ im Menübildschirm, um einen neuen Kontakt hinzuzufügen. Es wird der folgende Bildschirm angezeigt –
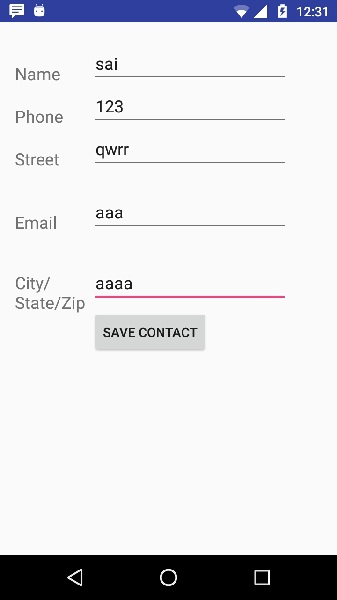
Es werden die folgenden Felder angezeigt. Bitte geben Sie die erforderlichen Informationen ein und klicken Sie auf Kontakt speichern. Es bringt Sie zurück zum Hauptbildschirm.
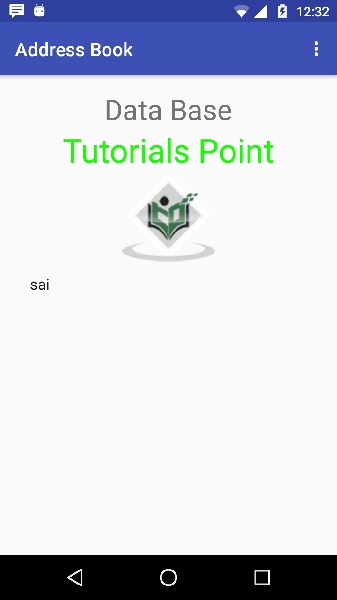
Jetzt ist unser Kontakt sai hinzugefügt worden.
Um zu sehen, wo Ihre Datenbank erstellt wurde. Öffnen Sie Ihr android studio, verbinden Sie Ihr Handy. Gehen Sie auf tools/android/android device monitor. Wechseln Sie nun auf die Registerkarte Datei-Explorer. Durchsuchen Sie nun diesen Ordner /data/data/<Ihr.Paket.Name>/Datenbanken<Datenbank-Name>.