SQLite is een opensource SQL database die gegevens opslaat naar een tekstbestand op een apparaat. Android wordt geleverd met een ingebouwde SQLite database implementatie.
SQLite ondersteunt alle relationele database functies. Om toegang te krijgen tot deze database, hoeft u geen verbindingen tot stand te brengen zoals JDBC, ODBC e.t.c
Database – Pakket
Het belangrijkste pakket is android.database.sqlite dat de klassen bevat om uw eigen databases te beheren
Database – Aanmaken
Om een database aan te maken hoeft u alleen maar deze methode openOrCreateDatabase op te roepen met uw databasenaam en modus als parameter. Het retourneert een instantie van SQLite database die u in uw eigen object moet ontvangen. De syntax is hieronder gegeven
SQLiteDatabase mydatabase = openOrCreateDatabase("your database name",MODE_PRIVATE,null);
Naast deze, zijn er andere functies beschikbaar in het database pakket, die dit werk doen. Ze staan hieronder opgesomd
| Sr.Nee | Method & Beschrijving |
|---|---|
| 1 | openDatabase(String path, SQLiteDatabase.CursorFactory factory, int flags, DatabaseErrorHandler errorHandler)
Deze methode opent alleen de bestaande database met de juiste vlagmodus. De gebruikelijke vlagmodus kan zijn OPEN_READWRITE OPEN_READONLY |
| 2 |
openDatabase(String path, SQLiteDatabase.CursorFactory factory, int flags) Het is vergelijkbaar met de bovenstaande methode omdat het ook de bestaande database opent, maar het definieert geen handler om de fouten van databases af te handelen |
| 3 |
openOrCreateDatabase(String path, SQLiteDatabase.CursorFactory factory) Het opent niet alleen, maar creëert ook de database als deze niet bestaat. Deze methode is gelijkwaardig aan de methode openDatabase. |
| 4 |
openOrCreateDatabase(File file, SQLiteDatabase.CursorFactory factory) Deze methode is gelijk aan bovenstaande methode, maar neemt het File object als een pad in plaats van een string. Het is gelijkwaardig aan file.getPath() |
Database – Invoegen
we kunnen een tabel maken of gegevens in een tabel invoegen met de execSQL methode die in de SQLiteDatabase klasse is gedefinieerd. De syntax is hieronder gegeven
mydatabase.execSQL("CREATE TABLE IF NOT EXISTS TutorialsPoint(Username VARCHAR,Password VARCHAR);");mydatabase.execSQL("INSERT INTO TutorialsPoint VALUES('admin','admin');");
Dit zal enkele waarden invoegen in onze tabel in onze database. Een andere methode die hetzelfde doet maar een extra parameter neemt, is hieronder gegeven
| Sr.Nee | Methode & Beschrijving |
|---|---|
| 1 |
execSQL(String sql, Object bindArgs) Deze methode voegt niet alleen gegevens in , maar ook gebruikt om reeds bestaande gegevens in de database bij te werken of te wijzigen met behulp van bindargumenten |
Database – Ophalen
We kunnen alles uit de database ophalen met behulp van een object van de klasse Cursor. We roepen een methode van deze klasse aan genaamd rawQuery en deze zal een resultset teruggeven met de cursor die naar de tabel wijst. We kunnen de cursor vooruit bewegen en de gegevens ophalen.
Cursor resultSet = mydatbase.rawQuery("Select * from TutorialsPoint",null);resultSet.moveToFirst();String username = resultSet.getString(0);String password = resultSet.getString(1);
Er zijn andere functies beschikbaar in de Cursor klasse waarmee we de gegevens effectief kunnen ophalen. Dat omvat
| Sr.Nee | Methode & Beschrijving |
|---|---|
| 1 |
getColumnCount() Deze methode geeft het totale aantal kolommen van de tabel terug. |
| 2 |
getColumnIndex(String columnName) Deze methode geeft het indexnummer van een kolom terug door de naam van de kolom op te geven |
| 3 |
getColumnName(int columnIndex) Deze methode geeft de naam van de kolom door de index van de kolom op te geven |
| 4 |
getColumnNames() Deze methode geeft de array van alle kolomnamen van de tabel. |
| 5 |
getCount() Deze methode geeft het totale aantal rijen in de cursor weer |
| 6 |
getPosition() Deze methode geeft de huidige positie van de cursor in de tabel weer |
| 7 |
isClosed() Deze methode geeft true terug als de cursor gesloten is en geeft false terug anders |
Database – Helper class
Voor het beheer van alle bewerkingen met betrekking tot de database , een helper klasse is gegeven en heet SQLiteOpenHelper. Het beheert automatisch de creatie en update van de database. De syntax is hieronder gegeven
public class DBHelper extends SQLiteOpenHelper { public DBHelper(){ super(context,DATABASE_NAME,null,1); } public void onCreate(SQLiteDatabase db) {} public void onUpgrade(SQLiteDatabase database, int oldVersion, int newVersion) {}}
Example
Hier volgt een voorbeeld dat het gebruik van SQLite Database demonstreert. Het maakt een basis contact toepassingen die het invoegen, verwijderen en wijzigen van contacten mogelijk maakt.
Om te experimenteren met dit voorbeeld, moet je dit uitvoeren op een echt apparaat waarop camera wordt ondersteund.
| Stappen | Beschrijving |
|---|---|
| 1 | U gaat Android studio gebruiken om een Android applicatie te maken onder een package com.example.sairamkrishna.myapplication. |
| 2 | Modify src/MainActivity.java file to get references of all the XML components and populate the contacts on listView. |
| 3 | Maak een nieuw src/DBHelper.java dat het database werk zal beheren |
| 4 | Maak een nieuwe Activiteit als DisplayContact.java die het contact op het scherm zal weergeven |
| 5 | Wijzig de res/layout/activity_main om de respectievelijke XML-componenten toe te voegen |
| 6 | Wijzig de res/layout/activity_display_contact.xml om de benodigde XML-componenten toe te voegen |
| 7 | wijzig de res/values/string.xml om de benodigde string-componenten toe te voegen |
| 8 | wijzig de res/menu/display_contact.xml om de nodige menu componenten toe te voegen |
| 9 | Maak een nieuw menu als res/menu/mainmenu.xml om de optie contact invoegen toe te voegen |
| 10 | Run de applicatie en kies een draaiend android apparaat en installeer de applicatie erop en controleer de resultaten. |
Volgende is de inhoud van de aangepaste MainActivity.java.
package com.example.sairamkrishna.myapplication;import android.content.Context;import android.content.Intent;import android.support.v7.app.ActionBarActivity;import android.os.Bundle;import android.view.KeyEvent;import android.view.Menu;import android.view.MenuItem;import android.view.View;import android.widget.AdapterView;import android.widget.ArrayAdapter;import android.widget.AdapterView.OnItemClickListener;import android.widget.ListView;import java.util.ArrayList;import java.util.List;public class MainActivity extends ActionBarActivity { public final static String EXTRA_MESSAGE = "MESSAGE"; private ListView obj; DBHelper mydb; @Override protected void onCreate(Bundle savedInstanceState) { super.onCreate(savedInstanceState); setContentView(R.layout.activity_main); mydb = new DBHelper(this); ArrayList array_list = mydb.getAllCotacts(); ArrayAdapter arrayAdapter=new ArrayAdapter(this,android.R.layout.simple_list_item_1, array_list); obj = (ListView)findViewById(R.id.listView1); obj.setAdapter(arrayAdapter); obj.setOnItemClickListener(new OnItemClickListener(){ @Override public void onItemClick(AdapterView<?> arg0, View arg1, int arg2,long arg3) { // TODO Auto-generated method stub int id_To_Search = arg2 + 1; Bundle dataBundle = new Bundle(); dataBundle.putInt("id", id_To_Search); Intent intent = new Intent(getApplicationContext(),DisplayContact.class); intent.putExtras(dataBundle); startActivity(intent); } }); } @Override public boolean onCreateOptionsMenu(Menu menu) { // Inflate the menu; this adds items to the action bar if it is present. getMenuInflater().inflate(R.menu.menu_main, menu); return true; } @Override public boolean onOptionsItemSelected(MenuItem item){ super.onOptionsItemSelected(item); switch(item.getItemId()) { case R.id.item1:Bundle dataBundle = new Bundle(); dataBundle.putInt("id", 0); Intent intent = new Intent(getApplicationContext(),DisplayContact.class); intent.putExtras(dataBundle); startActivity(intent); return true; default: return super.onOptionsItemSelected(item); } } public boolean onKeyDown(int keycode, KeyEvent event) { if (keycode == KeyEvent.KEYCODE_BACK) { moveTaskToBack(true); } return super.onKeyDown(keycode, event); }}
Hieronder staat de gewijzigde inhoud van de activiteit DisplayContact.java
package com.example.sairamkrishna.myapplication;import android.os.Bundle;import android.app.Activity;import android.app.AlertDialog;import android.content.DialogInterface;import android.content.Intent;import android.database.Cursor;import android.view.Menu;import android.view.MenuItem;import android.view.View;import android.widget.Button;import android.widget.TextView;import android.widget.Toast;public class DisplayContact extends Activity { int from_Where_I_Am_Coming = 0; private DBHelper mydb ; TextView name ; TextView phone; TextView email; TextView street; TextView place; int id_To_Update = 0; @Override protected void onCreate(Bundle savedInstanceState) { super.onCreate(savedInstanceState); setContentView(R.layout.activity_display_contact); name = (TextView) findViewById(R.id.editTextName); phone = (TextView) findViewById(R.id.editTextPhone); email = (TextView) findViewById(R.id.editTextStreet); street = (TextView) findViewById(R.id.editTextEmail); place = (TextView) findViewById(R.id.editTextCity); mydb = new DBHelper(this); Bundle extras = getIntent().getExtras(); if(extras !=null) { int Value = extras.getInt("id"); if(Value>0){ //means this is the view part not the add contact part. Cursor rs = mydb.getData(Value); id_To_Update = Value; rs.moveToFirst(); String nam = rs.getString(rs.getColumnIndex(DBHelper.CONTACTS_COLUMN_NAME)); String phon = rs.getString(rs.getColumnIndex(DBHelper.CONTACTS_COLUMN_PHONE)); String emai = rs.getString(rs.getColumnIndex(DBHelper.CONTACTS_COLUMN_EMAIL)); String stree = rs.getString(rs.getColumnIndex(DBHelper.CONTACTS_COLUMN_STREET)); String plac = rs.getString(rs.getColumnIndex(DBHelper.CONTACTS_COLUMN_CITY)); if (!rs.isClosed()) { rs.close(); } Button b = (Button)findViewById(R.id.button1); b.setVisibility(View.INVISIBLE); name.setText((CharSequence)nam); name.setFocusable(false); name.setClickable(false); phone.setText((CharSequence)phon); phone.setFocusable(false); phone.setClickable(false); email.setText((CharSequence)emai); email.setFocusable(false); email.setClickable(false); street.setText((CharSequence)stree); street.setFocusable(false); street.setClickable(false); place.setText((CharSequence)plac); place.setFocusable(false); place.setClickable(false); } } } @Override public boolean onCreateOptionsMenu(Menu menu) { // Inflate the menu; this adds items to the action bar if it is present. Bundle extras = getIntent().getExtras(); if(extras !=null) { int Value = extras.getInt("id"); if(Value>0){ getMenuInflater().inflate(R.menu.display_contact, menu); } else{ getMenuInflater().inflate(R.menu.menu_main menu); } } return true; } public boolean onOptionsItemSelected(MenuItem item) { super.onOptionsItemSelected(item); switch(item.getItemId()) { case R.id.Edit_Contact: Button b = (Button)findViewById(R.id.button1); b.setVisibility(View.VISIBLE); name.setEnabled(true); name.setFocusableInTouchMode(true); name.setClickable(true); phone.setEnabled(true); phone.setFocusableInTouchMode(true); phone.setClickable(true); email.setEnabled(true); email.setFocusableInTouchMode(true); email.setClickable(true); street.setEnabled(true); street.setFocusableInTouchMode(true); street.setClickable(true); place.setEnabled(true); place.setFocusableInTouchMode(true); place.setClickable(true); return true; case R.id.Delete_Contact: AlertDialog.Builder builder = new AlertDialog.Builder(this); builder.setMessage(R.string.deleteContact) .setPositiveButton(R.string.yes, new DialogInterface.OnClickListener() { public void onClick(DialogInterface dialog, int id) { mydb.deleteContact(id_To_Update); Toast.makeText(getApplicationContext(), "Deleted Successfully", Toast.LENGTH_SHORT).show(); Intent intent = new Intent(getApplicationContext(),MainActivity.class); startActivity(intent); } }) .setNegativeButton(R.string.no, new DialogInterface.OnClickListener() { public void onClick(DialogInterface dialog, int id) { // User cancelled the dialog } }); AlertDialog d = builder.create(); d.setTitle("Are you sure"); d.show(); return true; default: return super.onOptionsItemSelected(item); } } public void run(View view) { Bundle extras = getIntent().getExtras(); if(extras !=null) { int Value = extras.getInt("id"); if(Value>0){ if(mydb.updateContact(id_To_Update,name.getText().toString(), phone.getText().toString(), email.getText().toString(), street.getText().toString(), place.getText().toString())){ Toast.makeText(getApplicationContext(), "Updated", Toast.LENGTH_SHORT).show(); Intent intent = new Intent(getApplicationContext(),MainActivity.class); startActivity(intent); } else{ Toast.makeText(getApplicationContext(), "not Updated", Toast.LENGTH_SHORT).show(); } } else{ if(mydb.insertContact(name.getText().toString(), phone.getText().toString(), email.getText().toString(), street.getText().toString(), place.getText().toString())){ Toast.makeText(getApplicationContext(), "done", Toast.LENGTH_SHORT).show(); } else{ Toast.makeText(getApplicationContext(), "not done", Toast.LENGTH_SHORT).show(); } Intent intent = new Intent(getApplicationContext(),MainActivity.class); startActivity(intent); } } }}
Hieronder staat de gewijzigde inhoud van de Database class DBHelper.java
package com.example.sairamkrishna.myapplication;import java.util.ArrayList;import java.util.HashMap;import java.util.Hashtable;import android.content.ContentValues;import android.content.Context;import android.database.Cursor;import android.database.DatabaseUtils;import android.database.sqlite.SQLiteOpenHelper;import android.database.sqlite.SQLiteDatabase;public class DBHelper extends SQLiteOpenHelper { public static final String DATABASE_NAME = "MyDBName.db"; public static final String CONTACTS_TABLE_NAME = "contacts"; public static final String CONTACTS_COLUMN_ID = "id"; public static final String CONTACTS_COLUMN_NAME = "name"; public static final String CONTACTS_COLUMN_EMAIL = "email"; public static final String CONTACTS_COLUMN_STREET = "street"; public static final String CONTACTS_COLUMN_CITY = "place"; public static final String CONTACTS_COLUMN_PHONE = "phone"; private HashMap hp; public DBHelper(Context context) { super(context, DATABASE_NAME , null, 1); } @Override public void onCreate(SQLiteDatabase db) { // TODO Auto-generated method stub db.execSQL( "create table contacts " + "(id integer primary key, name text,phone text,email text, street text,place text)" ); } @Override public void onUpgrade(SQLiteDatabase db, int oldVersion, int newVersion) { // TODO Auto-generated method stub db.execSQL("DROP TABLE IF EXISTS contacts"); onCreate(db); } public boolean insertContact (String name, String phone, String email, String street,String place) { SQLiteDatabase db = this.getWritableDatabase(); ContentValues contentValues = new ContentValues(); contentValues.put("name", name); contentValues.put("phone", phone); contentValues.put("email", email); contentValues.put("street", street); contentValues.put("place", place); db.insert("contacts", null, contentValues); return true; } public Cursor getData(int id) { SQLiteDatabase db = this.getReadableDatabase(); Cursor res = db.rawQuery( "select * from contacts where", null ); return res; } public int numberOfRows(){ SQLiteDatabase db = this.getReadableDatabase(); int numRows = (int) DatabaseUtils.queryNumEntries(db, CONTACTS_TABLE_NAME); return numRows; } public boolean updateContact (Integer id, String name, String phone, String email, String street,String place) { SQLiteDatabase db = this.getWritableDatabase(); ContentValues contentValues = new ContentValues(); contentValues.put("name", name); contentValues.put("phone", phone); contentValues.put("email", email); contentValues.put("street", street); contentValues.put("place", place); db.update("contacts", contentValues, "id = ? ", new String { Integer.toString(id) } ); return true; } public Integer deleteContact (Integer id) { SQLiteDatabase db = this.getWritableDatabase(); return db.delete("contacts", "id = ? ", new String { Integer.toString(id) }); } public ArrayList<String> getAllCotacts() { ArrayList<String> array_list = new ArrayList<String>(); //hp = new HashMap(); SQLiteDatabase db = this.getReadableDatabase(); Cursor res = db.rawQuery( "select * from contacts", null ); res.moveToFirst(); while(res.isAfterLast() == false){ array_list.add(res.getString(res.getColumnIndex(CONTACTS_COLUMN_NAME))); res.moveToNext(); } return array_list; }}
Hieronder volgt de inhoud van de res/layout/activity_main.xml
<?xml version="1.0" encoding="utf-8"?><RelativeLayout xmlns:android="http://schemas.android.com/apk/res/android" xmlns:tools="http://schemas.android.com/tools" android:layout_width="match_parent" android:layout_height="match_parent" android:paddingLeft="@dimen/activity_horizontal_margin" android:paddingRight="@dimen/activity_horizontal_margin" android:paddingTop="@dimen/activity_vertical_margin" android:paddingBottom="@dimen/activity_vertical_margin" tools:context=".MainActivity"> <TextView android:layout_width="wrap_content" android:layout_height="wrap_content" android:id="@+id/textView" android:layout_alignParentTop="true" android:layout_centerHorizontal="true" android:textSize="30dp" android:text="Data Base" /> <TextView android:layout_width="wrap_content" android:layout_height="wrap_content" android:text="Tutorials Point" android:id="@+id/textView2" android:layout_below="@+id/textView" android:layout_centerHorizontal="true" android:textSize="35dp" android:textColor="#ff16ff01" /> <ImageView android:layout_width="wrap_content" android:layout_height="wrap_content" android:id="@+id/imageView" android:layout_below="@+id/textView2" android:layout_centerHorizontal="true" android:src="@drawable/logo"/> <ScrollView android:layout_width="wrap_content" android:layout_height="wrap_content" android:id="@+id/scrollView" android:layout_below="@+id/imageView" android:layout_alignParentLeft="true" android:layout_alignParentStart="true" android:layout_alignParentBottom="true" android:layout_alignParentRight="true" android:layout_alignParentEnd="true"> <ListView android:id="@+id/listView1" android:layout_width="match_parent" android:layout_height="wrap_content" android:layout_centerHorizontal="true" android:layout_centerVertical="true" > </ListView> </ScrollView></RelativeLayout>
Volgend is de inhoud van de res/layout/activity_display_contact.xml
<?xml version="1.0" encoding="utf-8"?><ScrollView xmlns:android="http://schemas.android.com/apk/res/android" xmlns:tools="http://schemas.android.com/tools" android:id="@+id/scrollView1" android:layout_width="match_parent" android:layout_height="wrap_content" tools:context=".DisplayContact" > <RelativeLayout android:layout_width="match_parent" android:layout_height="370dp" android:paddingBottom="@dimen/activity_vertical_margin" android:paddingLeft="@dimen/activity_horizontal_margin" android:paddingRight="@dimen/activity_horizontal_margin" android:paddingTop="@dimen/activity_vertical_margin"> <EditText android:id="@+id/editTextName" android:layout_width="wrap_content" android:layout_height="wrap_content" android:layout_alignParentLeft="true" android:layout_marginTop="5dp" android:layout_marginLeft="82dp" android:ems="10" android:inputType="text" > </EditText> <EditText android:id="@+id/editTextEmail" android:layout_width="wrap_content" android:layout_height="wrap_content" android:layout_alignLeft="@+id/editTextStreet" android:layout_below="@+id/editTextStreet" android:layout_marginTop="22dp" android:ems="10" android:inputType="textEmailAddress" /> <TextView android:id="@+id/textView1" android:layout_width="wrap_content" android:layout_height="wrap_content" android:layout_alignBottom="@+id/editTextName" android:layout_alignParentLeft="true" android:text="@string/name" android:textAppearance="?android:attr/textAppearanceMedium" /> <Button android:id="@+id/button1" android:layout_width="wrap_content" android:layout_height="wrap_content" android:layout_alignLeft="@+id/editTextCity" android:layout_alignParentBottom="true" android:layout_marginBottom="28dp" android:onClick="run" android:text="@string/save" /> <TextView android:id="@+id/textView2" android:layout_width="wrap_content" android:layout_height="wrap_content" android:layout_alignBottom="@+id/editTextEmail" android:layout_alignLeft="@+id/textView1" android:text="@string/email" android:textAppearance="?android:attr/textAppearanceMedium" /> <TextView android:id="@+id/textView5" android:layout_width="wrap_content" android:layout_height="wrap_content" android:layout_alignBottom="@+id/editTextPhone" android:layout_alignLeft="@+id/textView1" android:text="@string/phone" android:textAppearance="?android:attr/textAppearanceMedium" /> <TextView android:id="@+id/textView4" android:layout_width="wrap_content" android:layout_height="wrap_content" android:layout_above="@+id/editTextEmail" android:layout_alignLeft="@+id/textView5" android:text="@string/street" android:textAppearance="?android:attr/textAppearanceMedium" /> <EditText android:id="@+id/editTextCity" android:layout_width="wrap_content" android:layout_height="wrap_content" android:layout_alignRight="@+id/editTextName" android:layout_below="@+id/editTextEmail" android:layout_marginTop="30dp" android:ems="10" android:inputType="text" /> <TextView android:id="@+id/textView3" android:layout_width="wrap_content" android:layout_height="wrap_content" android:layout_alignBaseline="@+id/editTextCity" android:layout_alignBottom="@+id/editTextCity" android:layout_alignParentLeft="true" android:layout_toLeftOf="@+id/editTextEmail" android:text="@string/country" android:textAppearance="?android:attr/textAppearanceMedium" /> <EditText android:id="@+id/editTextStreet" android:layout_width="wrap_content" android:layout_height="wrap_content" android:layout_alignLeft="@+id/editTextName" android:layout_below="@+id/editTextPhone" android:ems="10" android:inputType="text" > <requestFocus /> </EditText> <EditText android:id="@+id/editTextPhone" android:layout_width="wrap_content" android:layout_height="wrap_content" android:layout_alignLeft="@+id/editTextStreet" android:layout_below="@+id/editTextName" android:ems="10" android:inputType="phone|text" /> </RelativeLayout></ScrollView>
Volgend is de inhoud van de res/value/string.xml
<?xml version="1.0" encoding="utf-8"?><resources> <string name="app_name">Address Book</string> <string name="action_settings">Settings</string> <string name="hello_world">Hello world!</string> <string name="Add_New">Add New</string> <string name="edit">Edit Contact</string> <string name="delete">Delete Contact</string> <string name="title_activity_display_contact">DisplayContact</string> <string name="name">Name</string> <string name="phone">Phone</string> <string name="email">Email</string> <string name="street">Street</string> <string name="country">City/State/Zip</string> <string name="save">Save Contact</string> <string name="deleteContact">Are you sure, you want to delete it.</string> <string name="yes">Yes</string> <string name="no">No</string></resources>
Volgend is de inhoud van het res/menu/main_menu.xml
<?xml version="1.0" encoding="utf-8"?><menu xmlns:android="http://schemas.android.com/apk/res/android" > <item android:id="@+id/item1" android:icon="@drawable/add" android:title="@string/Add_New" > </item> </menu>
Volgend is de inhoud van het res/menu/display_contact.xml
<?xml version="1.0" encoding="utf-8"?><menu xmlns:android="http://schemas.android.com/apk/res/android" > <item android:id="@+id/Edit_Contact" android:orderInCategory="100" android:title="@string/edit"/> <item android:id="@+id/Delete_Contact" android:orderInCategory="100" android:title="@string/delete"/></menu>
Dit is de defualt AndroidManifest.xml van dit project
<?xml version="1.0" encoding="utf-8"?><manifest xmlns:android="http://schemas.android.com/apk/res/android" package="com.example.sairamkrishna.myapplication" > <application android:allowBackup="true" android:icon="@mipmap/ic_launcher" android:label="@string/app_name" android:theme="@style/AppTheme" > <activity android:name=".MainActivity" android:label="@string/app_name" > <intent-filter> <action android:name="android.intent.action.MAIN" /> <category android:name="android.intent.category.LAUNCHER" /> </intent-filter> </activity> <activity android:name=".DisplayContact"/> </application></manifest>
Laten we eens proberen om uw applicatie uit te voeren. Ik neem aan dat u uw huidige Android Mobile apparaat met uw computer hebt verbonden. Om de app van Android studio uit te voeren, open een van uw project activiteit bestanden en klik op Run  icoon van de werkbalk. Voordat u uw applicatie start, zal Android studio het volgende venster weergeven om een optie te selecteren waar u uw Android applicatie wilt uitvoeren.

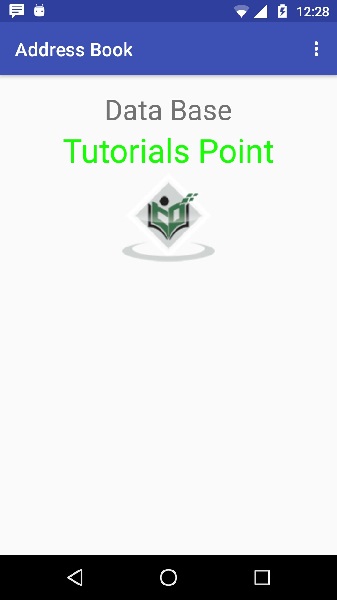
Selecteer uw mobiele apparaat als optie en controleer vervolgens uw mobiele apparaat waardoor het volgende scherm wordt weergegeven –
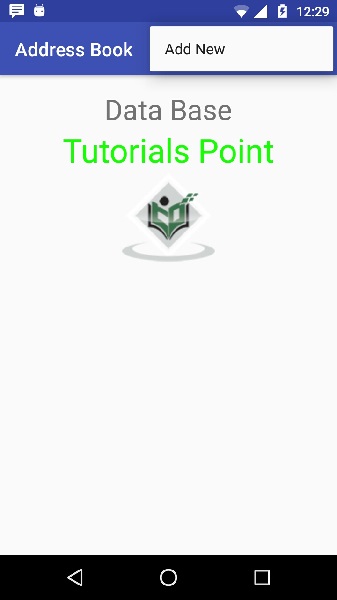
Nu opent u uw optionele menu, het zal worden weergegeven als onderstaande afbeelding: Optioneel menu verschijnt op verschillende plaatsen op verschillende versies
Klik op de knop Toevoegen in het menuscherm om een nieuw contact toe te voegen. Het volgende scherm wordt weergegeven –
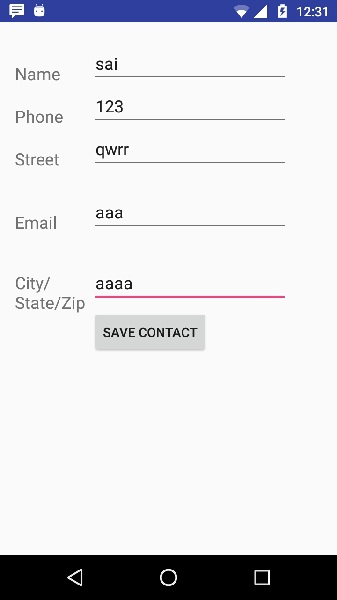
De volgende velden worden weergegeven. Voer de vereiste informatie in en klik op contact opslaan. U keert terug naar het hoofdscherm.
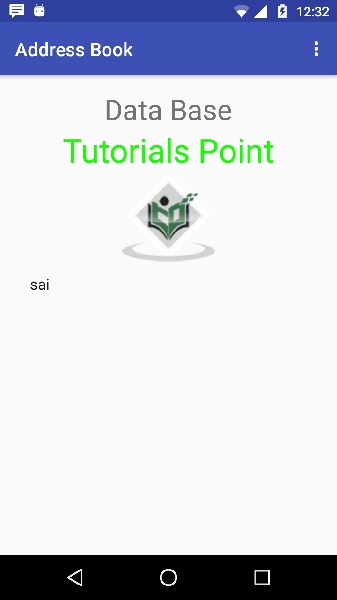
Nu is onze contact sai toegevoegd.Om te zien dat waar is uw database is gemaakt. Open uw android studio, sluit uw mobiele. Ga naar tools/android/android device monitor. Nu blader door het tabblad bestandsverkenner. Blader nu door deze map /data/data/<uw.pakket.naam>/databases<database-naam>.